Physical Exam (PE) Section

The Physical Exam section is used to complete the PE step of the Exam stage in the patient encounter. Information recorded here is added to the Visits and Cases section of the patient chart.
You can configure physical exam templates using the Physical Exam Templates page.
In the Exam stage of the patient encounter, click PE in the Exam stage navigation bar.
In the Exam stage of the encounter:
- Click the Next button, or click PE to proceed to the PE step.
The Physical Exam section appears in the center pane, and the Exam stage navigation bar changes to highlight PE.
- Add a note in the note field if necessary.
If the note needs to be hidden from patients and family members or caretakers who have access to their health information, click to mark the note confidential. See User Guide — Lock Patient Data for more information.
 - To add procedure documentation, click the plus icon
 next to "Procedure Documentation."
A list of procedure templates and any previous templates for this patient appear, with your commonly used templates at the top. The rendering provider's name appears in the list of previous templates.
Note: If you have the Multispecialty Practice feature enabled, the list of available templates is filtered by age, gender, and specialty. - Select a procedure template and complete it. Procedure templates appear in the full encounter summary and on the Visits and Cases section in the patient chart.
Note: If the procedure template has been mapped to a procedure code, the Billing tab is pre-populated with the procedure and codes.
You can use the jotter tool to create free-hand images to help document a patient's condition. The jotter tool is available in the following encounter sections:
- In any of the encounter sections mentioned above (HPI, ROS, PE, or Procedure Documentation), click the plus icon
 .
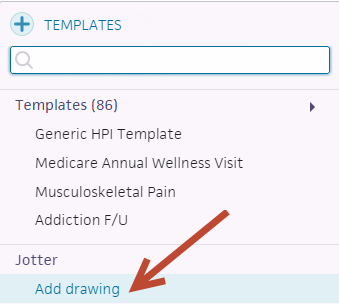
. - At the bottom of the menu, select "Add drawing" under the Jotter heading.

- In the Jotter tool, select the desired anatomical drawings or use the default blank jotter.
- Use the pen to create a free-hand drawing. You can also use the text, color, line weight, erase, and clear options as needed.
- Click the Save button (in the top right corner) to save your progress, and click outside the Jotter window to return to your encounter workflow.
Thumbnails of your newly marked drawings will now appear at the bottom of the encounter section.
You can click on these thumbnails to make edits or add new drawings.
Note: Any unmarked drawings will not be saved.
When you reuse a previous History of the Present Illness (HPI), Review of Systems (ROS), or Physical Exam (PE) section, athenaOne applies any jotter images associated with the previous encounter (in addition to templated and free-text notes), to the current encounter.
athenaOne adds the images and notes to any existing content that you have already documented in the section for the current encounter, whether you add the previous encounter content using the Visits tab of the patient chart or from the encounter section.
If you try to reuse a jotter image that already exists for the current encounter, athenaOne keeps the existing image. For example, if you have already annotated a foot image in the HPI step, and later reuse a previous HPI section that also has a foot image, athenaOne keeps the first one to avoid overwriting content you documented specifically for the current encounter. If you decide that you do want to use the previous encounter's jotter image, you can delete the existing jotter image and click the reuse icon ![]() or the section again.
or the section again.
In all other cases, clicking the reuse icon ![]() adds the previous encounter's images to the section to existing content. For example, if you had already annotated a foot image in HPI, and later reuse a previous HPI that has a torso image, athenaOne adds the torso image to the section in addition to the foot image.
adds the previous encounter's images to the section to existing content. For example, if you had already annotated a foot image in HPI, and later reuse a previous HPI that has a torso image, athenaOne adds the torso image to the section in addition to the foot image.